So, a quick update today,
Here is where the Terminators are at for the IVth Legion. Obviously, Perturabo and the Tyrants aren't pictured, but they do exist, trust me!
Obviously, there are the 3 HQ's I made a few weeks back, Erasmus Golg, Forge Lord and Primus Medicae
There is gold squad, who are painted in the same scheme as the existing terminators in the army. Gold squad is mostly armed with combi-plasma.
Silver squad is painted similar to the Cataphractii Terminator pictured in Book III (also, I put a copy of him below. Note the dark silver armour with bright silver trim. Fun times making that look right...
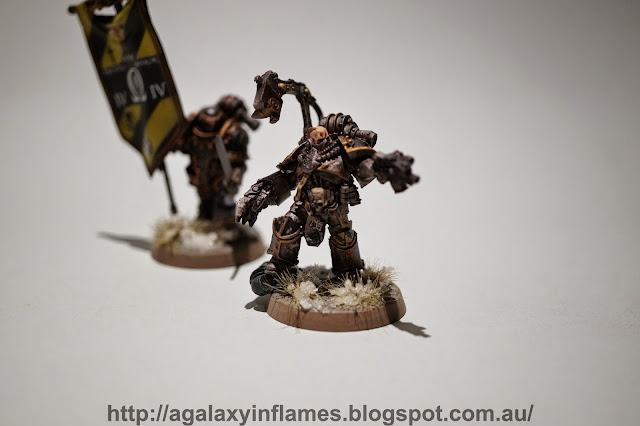
There is also grey squad... who shouldn't be grey, but I can only paint so fast. There is also a wip banner bearer for a command squad option, his banner is the 40k Grey Knight one where I have filed all the detail off and smoothed it over with putty. Took forever for the record.
I'm digging the colour palette for the plasma blast gun, with burnished barrel and glowing coils.
I heavily weathered the chevrons on the silver squad, which is all hand painted (as you'll see in the close ups). For me, it helps the look.
Yes, that's ALL hand painted, and it is kind of a pain in the ass painting symetrical stripes of black and yellow.
So there you have it, the work in progress shots of the Iron Warrior Cataphractii Terminators, an army I am hoping to debut at Inferno IV with their Primarch at their side.
~Macca
Showing posts with label Commander. Show all posts
Thursday, 3 September 2015
Monday, 24 August 2015
Home Made Damocles Command Tank
Another day, and a fun conversion. today we have my home-made version of a MK I Damocles Command Tank.
The Damocles is an existing kit from Forge World, based on the MK II Rhino chassis. I am thinking of using one in a tournament coming up in October (Inferno IV, in Brisbane. If you're in Australia, do check it out, it's a lot of fun and a great opportunity to meet a bunch of passionate HH hobbyists) and I decided I needed one. Since the kit is around $115 Australian, I thought instead I could convert one rather than pay all that money for a tank I may not need.
Thus, the MK I Damocles was born.
The old red rhino I repainted had textured paint on it, which meant that I had no option, bar completely stripping the textured paint (which is much harder than regular paint, without plastic dissolving solvents) than to paint some dust and mud onto the tracks. So, I painted some mud and dust onto the tracks. It's not ideal, but it's good enough.
I cast myself a mid-size Iron Warrior emblem for the front visor, as well as making a small scroll for the IVth legion on the opposite side. The hazards had to be worked into the vehicle somewhere, so I put them above the slits. I think it's the perfect spot and it actually complements the vehicle, as opposed to painting them into all the inlays on the side.
The tank has a nice Olympian sounding name and this Greek pattern motif throughout. These are off the Minotaurs Transfer Sheet from Forge World, because I felt my freehand wasn't up to the task of such tiny tiny symbols.
The dish itself is a pair of grates off a Nephallim Fighter from 40k, attached to a chaos searchlight, with a small aquilla from an old Leman Russ kit attached to make it more imperial-y. The assembly is mounted atop a chaos rhino cupola slightly modified to look more like a scanner.
A few spare cables, a filter off a German King Tiger tank and a bit of a hunter killer were combined together for the small generator unit behind the dish.
So, all in all, this is the kind of project that I have come to LOVE about the hobby. A simple idea, for a budget command tank, realised with just parts I had lying around. I think it looks good enough that nobody will complain, well, at least I hope.
~Macca
The Damocles is an existing kit from Forge World, based on the MK II Rhino chassis. I am thinking of using one in a tournament coming up in October (Inferno IV, in Brisbane. If you're in Australia, do check it out, it's a lot of fun and a great opportunity to meet a bunch of passionate HH hobbyists) and I decided I needed one. Since the kit is around $115 Australian, I thought instead I could convert one rather than pay all that money for a tank I may not need.
Thus, the MK I Damocles was born.
The old red rhino I repainted had textured paint on it, which meant that I had no option, bar completely stripping the textured paint (which is much harder than regular paint, without plastic dissolving solvents) than to paint some dust and mud onto the tracks. So, I painted some mud and dust onto the tracks. It's not ideal, but it's good enough.
I cast myself a mid-size Iron Warrior emblem for the front visor, as well as making a small scroll for the IVth legion on the opposite side. The hazards had to be worked into the vehicle somewhere, so I put them above the slits. I think it's the perfect spot and it actually complements the vehicle, as opposed to painting them into all the inlays on the side.
The tank has a nice Olympian sounding name and this Greek pattern motif throughout. These are off the Minotaurs Transfer Sheet from Forge World, because I felt my freehand wasn't up to the task of such tiny tiny symbols.
The dish itself is a pair of grates off a Nephallim Fighter from 40k, attached to a chaos searchlight, with a small aquilla from an old Leman Russ kit attached to make it more imperial-y. The assembly is mounted atop a chaos rhino cupola slightly modified to look more like a scanner.
A few spare cables, a filter off a German King Tiger tank and a bit of a hunter killer were combined together for the small generator unit behind the dish.
IRON WITHIN, IRON WITHOUT
Here is the starting Rhino, it was a mess!

So, all in all, this is the kind of project that I have come to LOVE about the hobby. A simple idea, for a budget command tank, realised with just parts I had lying around. I think it looks good enough that nobody will complain, well, at least I hope.
~Macca
Sunday, 23 August 2015
Iron Warriors: Erasmas Golg and more Consuls!
Erasmus Golg.
Not many photos here, as he is the most simple conversion, simply a Grave Warden with a head swap and a vexillia.
Primus Medicae.
This guy was a little more effort. Apothecary lights and sensors were glued onto his torso, and his weapon is a conversion of the grenade launcher, combining a melta and bolter together for a combi-melta combination.
Multi-HQ.
The most fun of the three, this guy is a combination of a little Forge Lord, Siege Breaker, Warsmith, Praetor, Champion, Consul etc. This is my Jack-of-all-trades character, something I can use in multiple lists.
Befitting his stature and techno-prowess, I elected to modify the grenade launcher arm in a different way, combining a melta into it, and adding a small augery scanner (just above the hand). He has a large servo arm on his back, as well as a single frag assault launcher.
Three HQ's.
So there they are, three HQ's. The choice to go with more Cataphractii is in response to a few things:
-My previous force, the defensive siege force was too dominant in the ranged game, reducing the entire tournament I played in to a shooting game, I felt like dirty Tau.
-I have little to no effective Zone Mortalis forces. Can't defend the Contrador with MK IV armour!
-I lacked mobility. The one situation where my shooting failed was when Michael from the Eye of Horus backed away with the Relic hidden inside his Spartan. I had to cross the battlefield to grab it, I couldn't just shoot both the Spartan AND the Stone Gaunlet Breachers with Feel No Pain to death. I needed strong assault options to do it.
So, here I am. I hope you enjoy these quick snaps.
~Macca
Tuesday, 26 May 2015
A New Video & A New Logo!
G'day folks, Macca here with some announcements! First up, we have a new logo! I think it's pretty sweet, but I had a hand in designing it, so of course I'd think that. Not only this, but we have a new video format, which is similar but different to our old one, with the new intro showing the galaxy dissolving into chaos and flames. Perfect!

Here is the video for today, in case you were wondering ;)
Also, for Australian and New Zealand (New Zillund Bro), don't forget that we are organising a hobby Masterclass in Sydney featuring ex-Forge World painter Matthew Kane, the details are on Facebook, and can be found on this event page here.
So that about wraps up today, I hope you all enjoy the changes and all the exciting things going on in 30k in Australia right now. Lastly, a quick shout out to our mates over at the Eye of Horus podcast, I will definitely be your Mac at Inferno III!
Sunday, 17 May 2015
Narik Dreygur, Praevian Consul of the Iron Warriors: Part 2
Wow, hasn't a lot happened already this weekend? (That's of course for our overseas bloggers, for those of us here in Australia, it's actually closer to Monday than Friday now). Anyway, enough of that, here's what you came here to see: Narik Dreygur!
This miniature is incredibly detailed. Something approaching the actual Character Series, in my humble opinion! Check out the grim specter of death emblazoned onto his tabbard.
I also elected to paint some knee hazards, something I don't often do. After painting it and comparing it to the Forge World model, I noticed that's exactly how they did it too!
There are also 3 distinct gouges I have painted onto his power fist. I'm gonna call these the Wolverine marks.
This lens on his pistol is absolutely tiny. It was a bitch to paint, but in the end, I got there.
A Praevian Consul in all his glory.
Check out his banner....
What do you think? If you want to know how I did any particular, please feel free to let me know. Also feel free to leave feedback in general. Also, a shout out to Eadwine for supplying me with this miniature. Without him, I couldn't have got it without paying some price gouging fuck my first born baby, so cheers for that mate!
~Macca
Friday, 1 May 2015
So, it's been a little while, but I wanted to share the newest Praetor joins the ranks of the Iron Warriors. There are big things in the works from all the crew here, and unfortunately we've all been too focused on getting things done. This will change soon, so expect quite a few updates in the coming month. ~Macca
Expect a different helmet on this guy, I'm just waiting on the parts I have ordered to arrive.
Labels:
30k,
Commander,
Consul,
Conversion,
Iron Warriors,
Legion HQ,
power armour,
Praetor
Saturday, 21 March 2015
A Galaxy In Flames Video: Iron Warriors Command Squad
Hey guys, here's the second video from AGIF. This time we are looking at Macca's Iron Warrior Command Squad. Hope you enjoy!
Wednesday, 11 March 2015
A Galaxy In Flames Tutorial: Rebasing 25mm to 32mm
G'day all, Macca here with a tutorial and an update rolled together. Today we will be looking at rebasing our miniatures from 25mm plastic to 32mm plastic.
The idea today is that I will show you the simplest way to rebase, combined with some finished Iron Warriors, because... reasons?
Step 1:
To start with, I take a pair of clippers and cut the rim off from around the original base.
You should end up with a base like this, but you cannot and I must stress CANNOT just glue this to the new base. First, you have to remove all surface detail from the underside. This takes me to:
Step 2:
Place the miniature onto some large grit sandpaper, I chose P180. From here, you simply slide the base along, and within 10 strokes or so, the base will have smoothed out, leaving just a black smear of plastic on the sand paper.
Step 3:
Glue the 25mm cut outs directly to the 32mm bases. This is the easiest part of all.
Step 4:
Now, the fun part. As you'll notice, there is a noticeable rim left over. What you have to do here is blend it out. I used textured paint, in this case Vallejo Dark Earth, which comes in big tubs, thus meaning it doesn't dry out at a glance like GW's. I will note, that you can also use putty, or speck-filler products to even out the base.
I start in one area, and make sure to work my way around with a nice even coat. Don't be too picky, it's sand, and it should look natural.
So, with that done, that's how you rebase from 25mm to 32mm. I don't know who invented this approach originally, I do know that I used in on terminators when they went from 25mm to 40mm, however I was an inept hobbyist in those days, and failed to make such a clean joint. I'd share photos, but the quality of my miniatures back then is sorta like the Simpsons in season 1, it ain't pretty.
Now, some quick size comparisons.
Here are my Iron Havoks, the Autocannons on the right are only early in the painting process, but as they are an identical unit, for all intents and purposes, they work. First off, you'll notice that the unit footprint is HUGE now. Although I spaced the miniatures the same distance apart, the change is obvious. I can see this leading to some interesting situations with templates, with some positive AND negative situations.
Well, in the end, here's the finished result, with 2 HQ's, the command squad and Iron Havok squad one all rebased in the complete base scheme.
I hope you enjoyed this tutorial,
~Macca
Subscribe to:
Posts (Atom)